High Volume Asset Rounding
High Volume Asset Rounding lets you inspect many assets — such as fire extinguishers, HVAC units, or compliance checkpoints — within a single work order. A shared set of questions is applied across all selected assets automatically, reducing repetitive setup. Failed questions generate corrective work orders with full context, and a detailed report provides audit-ready proof of completion.
Prerequisites
-
Technician or Facilities Manager role with work order access in TheWorxHub.
-
Assets to be inspected are registered in the system with unique IDs or scan codes.
-
A compliance code linked to the assets exists (used for scheduling and planning).
-
Pass/fail questions are pre-configured for the task list, including N/A options where needed. M
How It Works
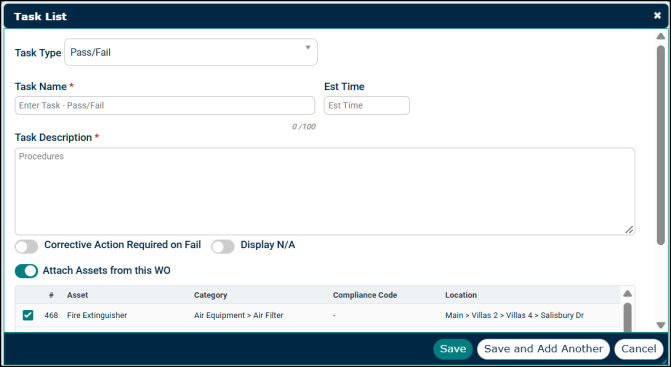
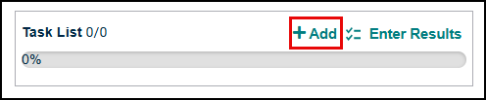
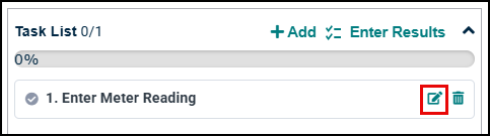
High Volume Asset Rounding is accessed inside a Work Order, in the task list section. When you click "+ Add" to "Add a New Task List" during work order creation, or "Edit Task List" on an existing work order, you will see the updated task list UI with the "Attach Assets from this WO" toggle.
NOTE The "Attach Assets from this WO" toggle is the key mechanism. When switched ON for a question, it automatically attaches every selected asset to that question — ensuring the question is asked for each asset during rounding. Questions are written once; the system duplicates them across all assets when the work order is generated.
Setting Up the Task List
Link Assets
-
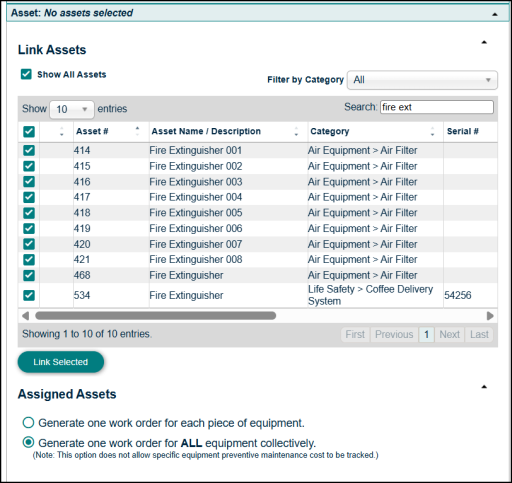
In the Asset section, select all assets to be included in the rounding round.
-
Use the asset search field to find assets by name, ID, location, or compliance code.
-
Check the box next to each asset to select it.
-
Confirm the total asset count in the summary before continuing.
-
Click on Link Selected.
Access the Task List
-
Open an existing work order or create a new one. In the task list section, click "+ Add" to build a new task list, or "Edit Task List" to update an existing one.
Add Questions to Task List
For each question in the task list, enable the "Attach Assets from this WO" toggle to apply it across all selected assets.
-
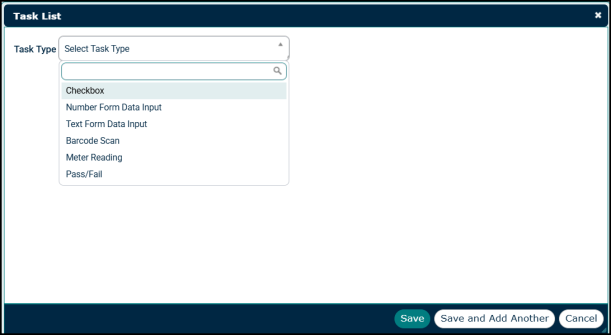
Click "+ Add" and select the task from the Task Type dropdown menu.
-
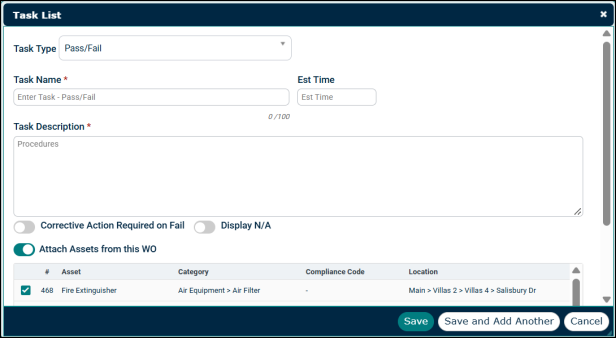
If you select the Pass/Fail task type, enter the question in the Task Name field.
-
Enter the description of the question in the Task Description field.
-
Turn on the "Corrective Action Required on Fail" toggle if you want to perform a corrective action when the task fails.
-
Turn on the "Display N/A" toggle if you want to display tasks that are not required.
-
Turn on the "Attach Assets from this WO" toggle if you want to attach multiple assets to the same work order.
NOTE Select the checkbox next to each asset that you want to attach to the work order.
-
To repeat and add another question, click on Save and Add Another button. Each question has its own independent toggle.
-
Click Save to save the task list.
NOTE Not every question needs the toggle. Tasks that apply to the work order as a whole — not to a specific asset — should have the toggle left OFF. These are called non-asset tasks and appear separately in the Enter Results screen.
Generate the Work Order
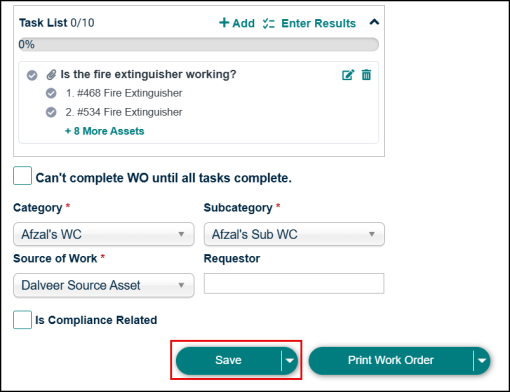
Once all assets and questions are configured, click Save. The system creates one copy of each toggled question per asset. For example, 10 assets × 5 questions produce 50 question entries. Non-asset tasks appear once at the top level.
Result: The work order is created with a progress bar at 0% and all assets marked Incomplete. The work order is now ready to assign and execute.
Entering Results — Desktop
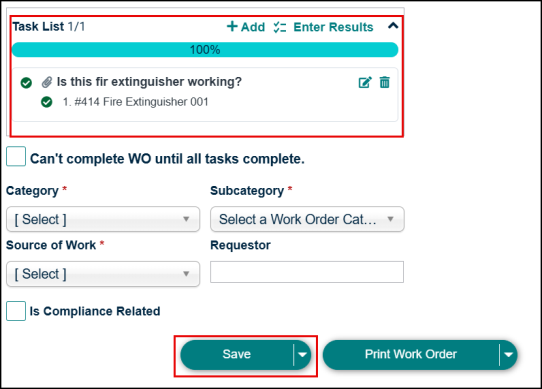
Open the assigned work order and click Enter Results in the task list section. The Enter Results screen lists all assets with a progress bar at the top. The progress bar tracks completion by number of assets fully answered — not by individual question count — giving a more accurate picture of real-world rounding progress. The bar displays a neutral color (blue) rather than green to avoid implying a pass/fail status before results are confirmed.

-
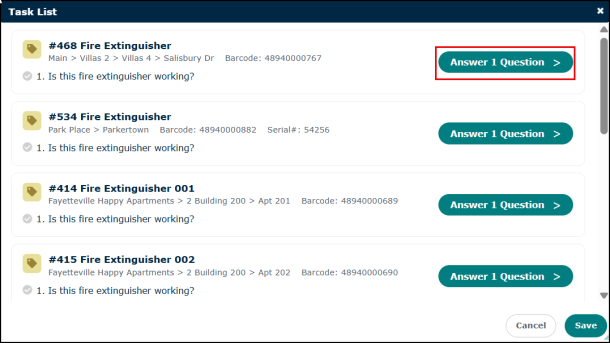
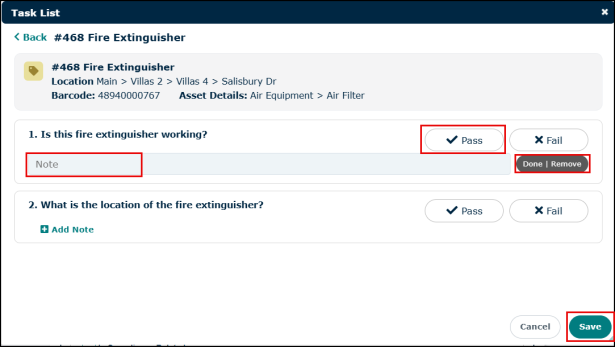
Click on Answer Question.
-
Answer each question, select Pass, Fail, or N/A for pass/fail questions; enter a value for numeric or text questions.
-
Add notes in the Notes field where supporting evidence is needed.
-
Click Save to save the current asset and move to the next one in the list.
-
When all assets’ tasks are complete (progress bar at 100%), click Save to submit Work Order.
Important: Do not close the browser tab mid-inspection without saving. Unsaved answers for the current asset will be lost. All previously completed assets are already saved.
Entering Results — Mobile
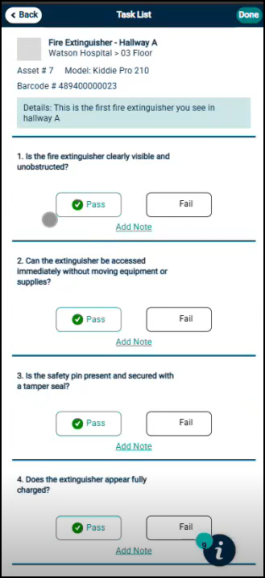
The mobile workflow mirrors the desktop. Open the work order in the Brightly mobile app, then progress through assets and answer questions in the field.
-
Open the app and tap Work Orders or create a New Work Order.
-
Add assets by scanning the QR code or adding them manually.
-
Link the asset to the Work Order.
-
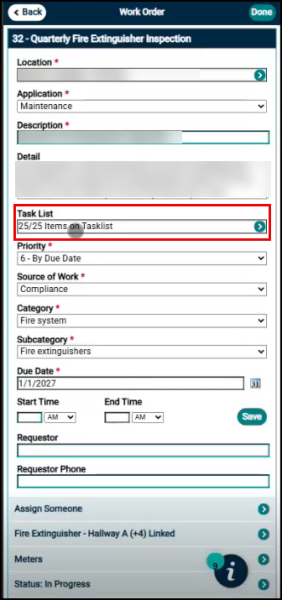
Click on the Task List.
-
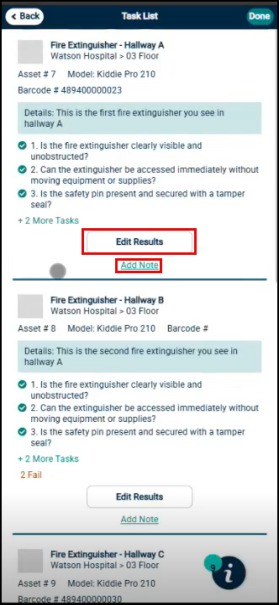
Answer each question, tap Pass, Fail, or N/A for new added asset or click Edit Results for the existing one then tap Done.
-
Repeat for each asset. The progress bar advances with each complete asset.
-
Tap Done when all assets are complete.
NOTE Offline mode is supported. Results entered without connectivity are saved locally and synchronized to the server automatically when the connection is restored.
NOTE "Save and Next Asset”— a button to save the current asset and automatically advance to the next — is a planned improvement to the mobile experience. Until it is available, tap Save Asset and then manually select the next asset from the list.
Pass, Fail, and N/A
Every Pass/Fail question in a rounding work order supports three responses:
-
Pass — The asset meets the requirements.
-
Fail — The asset does not meet the requirements. A corrective work order is automatically generated.
-
N/A — The question does not apply to this specific asset. No corrections are created. The N/A option must be enabled on the question during task list setup.
NOTE Enable N/A on any question where the answer may legitimately not apply to some assets — for example, a pressure gauge question on an asset type that has no gauge. This prevents false failures in your report's data.
Corrective Work Orders
When a question is marked Fail, a corrective work order is automatically created. You do not need to create it manually.
What the Corrective Work Order Contains
Each auto-generated corrective work order includes a contextual banner at the top of the work order detail screen — visible without scrolling — showing: T
-
The specific question on which the failure was detected.
-
The originating schedule — the subject and work order number of the source rounding work order.
This information lets the assigned technician immediately understand what needs fixing without having to cross-reference the parent work order.
Viewing the Activity Log
The work order activity log records the corrective generation event automatically. Open the Activity Log tab on the corrective work order to see the source rounding work order number, asset name, failed question, and schedule — useful for audit trails.
Resolving a Corrective Work Order
-
Go to Work Orders and filter by Type: Corrective.
-
Open the corrective work order, review the contextual banner, and assign it to the appropriate technician.
-
The technician performs the remediation and records the action taken.
-
Update the status to Resolved.
Result: The resolved corrective is linked to the parent rounding work order and appears in the Task List Results report as a closed finding.
Important: Do not delete the parent’s rounding work order while corrective items remain open. This will break the traceability chain and the audit trail in the report.
Task List Results Report
The Task List Results report is the primary document for compliance surveys and audits. It provides documented proof that all rounding activities were completed, and any failures were identified and resolved. Open it from the submitted work order by clicking View Report.
Report on Structure
The report is organized in a parent-to-child hierarchy:
-
Parent Work Order — number, title, status, site, assigned user, due date.
-
Asset — name, number, location, status.
-
Task — each question associated with that asset.
-
Task Result — Pass, Fail, or N/A.
-
Corrective Work Order (if triggered) corrective number, title, and status.
Export Report
Use Filter by Asset or Filter by Result to narrow the view, then click Export to generate a PDF or CSV for compliance records, regulatory submissions, or management review.
Facilities Manager View
Facilities Managers use the outcomes of rounding rounds to monitor compliance status, plan future rounds, and track corrective resolution.
-
Failed assets — View failed assets: Open the Task List Results report and filter by Result: Fail to see all non-compliant assets and whether their corrective work orders have been resolved.
-
Upcoming rounds — View assets coming due: Filter work orders by compliance code to see upcoming rounding rounds. Assets are grouped by location (building → floor → room) to support efficient route planning.
-
Corrective status — Track corrective resolution: Filter work orders by Type: Corrective and link back to the parent rounding work order to confirm all failures have been addressed before the next cycle.
